How I Transformed My Old Negatives into Stunning Digital Photos: A Step-by-Step Guide
As a lifelong photography enthusiast, I’ve always cherished the magic captured on film. Each negative holds a moment in time, a glimpse into the past that begs to be revisited. However, as technology has advanced, I found myself grappling with the challenge of preserving these precious memories in a digital age. Converting negatives to digital photos has become not just a practical necessity, but an exciting journey into the realm of digital preservation. In this article, I’ll share my insights and experiences on transforming those fragile strips of film into vibrant digital images, allowing me to breathe new life into my cherished memories. Join me as we explore the captivating world of film conversion, where nostalgia meets modern technology, and every click of the shutter unlocks a story waiting to be told.
I Tried Converting Negatives to Digital Photos on My Own and I’m Sharing My Honest Recommendations Below

KODAK SLIDE N SCAN Film and Slide Scanner with Large 5” LCD Screen, Convert Color & B&W Negatives & Slides 35mm, 126, 110 Film Negatives & Slides to High Resolution 22MP JPEG Digital Photos

KODAK 7″ Digital Film Scanner – Converts 35mm, 126, 110 Negatives & Slides to 22MP JPEGs
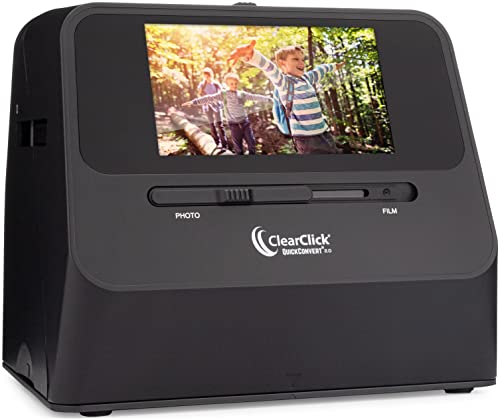
ClearClick QuickConvert 2.0 Photo, Slide, and Negative Scanner – Scan 4×6 Photos & 35mm, 110, 126 Film – No Computer Required – 22 MegaPixels
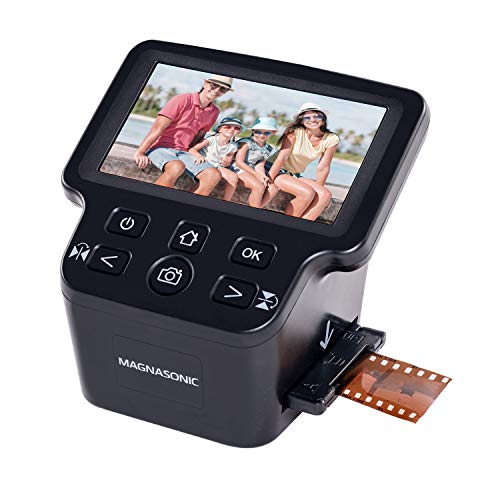
Magnasonic All-in-One 24MP Film Scanner with Large 5″ Display & HDMI, Converts 35mm/126/110/Super 8 Film & 135/126/110 Slides into Digital Photos, Built-in Memory (FS71)
1. KODAK SLIDE N SCAN Film and Slide Scanner with Large 5” LCD Screen, Convert Color & B&W Negatives & Slides 35mm, 126, 110 Film Negatives & Slides to High Resolution 22MP JPEG Digital Photos
I am truly excited to share my thoughts on the KODAK SLIDE N SCAN Film and Slide Scanner, a product that has the potential to breathe new life into your cherished memories. In today’s digital age, preserving our old photo memories is more important than ever, and this scanner is an outstanding tool that allows you to convert your color and black-and-white negatives and slides into high-resolution digital photos. With a stunning 22MP resolution, your old images will regain their vibrancy and detail, making them perfect for sharing with friends and family or simply enjoying for years to come.
One of the standout features of the KODAK SLIDE N SCAN is its large 5” LCD display. This crystal-clear screen offers a wide viewing angle, which makes it incredibly easy to preview and edit your photos instantly. Imagine being able to view your old slides and negatives right in front of you, making it so much simpler to decide which ones to convert into digital files. The gallery mode is a fantastic addition, allowing you to showcase your scanned images elegantly, whether in your home or office. I can already picture it as a beautiful digital picture frame that sparks conversations about the memories captured within those slides.
Convenience is key with this device, and the easy-load film inserts make the scanning process a breeze. The quick-feeding tray technology allows for continuous loading, meaning you can scan multiple slides and negatives without the hassle of constant setup. The inclusion of adapters for different film types (135, 110, and 126) as well as a 50mm slide holder ensures that you can handle a variety of formats. Plus, the cleaning brush and USB/HDMI cables included in the package provide added value, making it an all-in-one solution for digitizing your photo collection.
What I find particularly impressive is the editing capabilities that come with the KODAK SLIDE N SCAN. The advanced capture software enables you to enhance, resize, and convert your photos with just a single touch. The user-friendly interface with easy options for film type selection, color and brightness adjustments, and date/time assignment means you don’t need to be a tech wizard to use it. I appreciate how this product simplifies the process, allowing even those who may not be particularly tech-savvy to enjoy the benefits of digital photo preservation.
Lastly, the KODAK SLIDE N SCAN stands out not just for its functionality but also for its design. It’s super chic and blends seamlessly with your home décor. Additionally, it supports SD or SDHC cards up to 32GB, providing ample storage for your digitized memories. The ability to connect the scanner to any Type-C USB-enabled computer enhances its compatibility, making it a versatile addition to your tech collection.
Feature Description Resolution 22MP High Resolution for digitized photos Display 5” LCD screen with gallery mode Film Compatibility Supports 135, 110, 126mm negatives and slides Convenience Quick-feeding tray for easy loading Editing Features One-touch enhancements, resizing, and conversions Storage Support Compatible with SD/SDHC cards up to 32GB Connectivity USB and HDMI cables included for connection to computers
I believe that the KODAK SLIDE N SCAN Film and Slide Scanner is a fantastic investment for anyone looking to preserve their old photo memories. Its combination of high resolution, user-friendly features, and stylish design make it a standout choice in the market. If you’ve been holding onto old slides and negatives, now is the perfect time to convert them into digital treasures. Don’t let your precious memories fade away—consider giving the KODAK SLIDE N SCAN a try. I can assure you that you won’t regret it!
Get It From Amazon Now: Check Price on Amazon & FREE Returns
2. KODAK 7″ Digital Film Scanner – Converts 35mm, 126, 110 Negatives & Slides to 22MP JPEGs
As a photography enthusiast and someone who cherishes old memories, I recently came across the KODAK 7″ Digital Film Scanner, and I must say, it has completely transformed how I interact with my vintage photos. This device is not just a scanner; it’s a gateway to reliving the beautiful moments captured in time. Imagine being able to convert your old 35mm, 126, and 110 negatives and slides into stunning 22MP JPEGs that you can easily share with family and friends. The KODAK scanner does just that, and it does it effortlessly.
One of the standout features of this scanner is its impressive 7” LCD display, which offers a crystal-clear view and a wide-angle perspective for instant photo previews. I’ve found this incredibly helpful when deciding which images to edit or share. The gallery mode allows me to display my favorite memories like a digital picture frame, adding an elegant touch to my home décor or office space. It’s not just about scanning; it’s about showcasing those moments that matter to me.
The convenience factor of the KODAK 7″ Digital Film Scanner cannot be overstated. With its innovative quick-feeding tray technology, I can continuously load my negatives and slides without any hassle. The inclusion of various film adapters and a cleaning brush means I’m fully equipped to tackle my entire collection of old photos. Although an SD card is not included, the scanner supports SD or SDHC cards of up to 32GB, giving me ample storage for all my digital files.
What truly impressed me is the user-friendly editing capabilities. With a simple touch of a button, I can enhance, resize, and convert my photos without navigating complex screens or settings. This ease of use is perfect for someone like me who wants to get straight to the fun part—preserving and sharing those wonderful memories. The options to adjust color and brightness, as well as assign date and time, make it feel like I have full creative control over my digital archive.
Lastly, the KODAK 7″ Digital Film Scanner boasts a chic design that effortlessly blends into my home décor, making it a stylish addition to my workspace. Plus, it connects easily to any Type-C USB-enabled computer, ensuring compatibility with my existing technology. This scanner is truly a versatile and attractive device that caters to all my needs.
if you’re someone who values preserving memories and wants an efficient way to convert your old negatives and slides into digital files, I genuinely believe the KODAK 7″ Digital Film Scanner is a fantastic investment. It combines functionality, ease of use, and a beautiful design in one package. Don’t let those old memories fade away—grab this scanner and start your journey of digitizing your cherished moments today!
Feature Description Resolution Converts to 22MP JPEGs Display 7” LCD screen with gallery mode Film Types Supported 35mm, 126, 110 negatives & slides Loading Mechanism Convenient easy-load film inserts Editing Features Advanced capture software with one-touch editing Compatibility Supports SD/SDHC cards (up to 32GB) Connectivity Connects to Type-C USB-enabled computers
Get It From Amazon Now: Check Price on Amazon & FREE Returns
3. ClearClick QuickConvert 2.0 Photo, Slide, and Negative Scanner – Scan 4×6 Photos & 35mm, 110, 126 Film – No Computer Required – 22 MegaPixels
I recently came across the ClearClick QuickConvert 2.0 Photo, Slide, and Negative Scanner, and I must say, it has truly transformed the way I think about preserving memories. This device is specifically designed for individuals who have a treasure trove of old photos, slides, and negatives tucked away in albums or boxes. Whether you are a nostalgic individual wanting to relive cherished moments or someone looking to organize a family archive, this scanner is a game changer. Its convenience and efficiency in digitizing images is impressive, making it an essential tool for anyone wanting to preserve their visual history.
One of the standout features of the ClearClick QuickConvert 2.0 is its ability to scan various formats, including 4×6 photos, 35mm, 110, and 126 film negatives. The process is incredibly straightforward—just turn it on and start scanning! The fact that it does not require a computer or any complex software means that even those who may not be tech-savvy can easily operate it. This is a significant advantage, as it removes the intimidation factor often associated with technology, making it accessible to all ages. Just imagine being able to convert your old family photos into digital files that can be shared with friends and family at the click of a button!
In terms of performance, the QuickConvert 2.0 delivers impressive scanning speeds of just 2-3 seconds per photo, slide, or negative. This rapid conversion means you can get through a substantial collection without spending an entire day doing it. Additionally, it scans at 14 MegaPixels (with 22 MegaPixels interpolated), providing excellent quality and clarity for your digital images. The resulting files are saved as JPEGs on an SD memory card, allowing for easy storage and organization. This is perfect for anyone who wants to ensure that their memories are not only preserved but are also easily accessible in a digital format.
The built-in rechargeable battery is another fantastic feature, providing the freedom to scan anywhere without being tethered to a wall outlet. This portability can be particularly beneficial for those who may want to scan photos at family gatherings or during travel. Plus, the 5″ instant preview LCD screen allows you to see each scan immediately, ensuring you’re satisfied with the image quality before moving on to the next. It’s these thoughtful details that make the QuickConvert 2.0 so user-friendly and enjoyable to use.
Moreover, I appreciate the fact that the ClearClick QuickConvert 2.0 comes with a 2-year warranty and tech support from a USA small business. This not only demonstrates the brand’s commitment to quality but also provides peace of mind for users. If you ever encounter any issues or have questions, knowing that support is readily available is a significant plus.
In summary, the ClearClick QuickConvert 2.0 Photo, Slide, and Negative Scanner is an exceptional product that I wholeheartedly recommend to anyone looking to digitize their old memories. It offers a combination of ease of use, impressive scanning quality, and portability that is hard to beat. If you’re ready to take the plunge and preserve your treasured moments for future generations, this scanner could be just what you need. Don’t let those memories fade away—invest in the ClearClick QuickConvert 2.0 today!
Feature Details Scanning Capability 4×6 photos, 35mm, 110, 126 film negatives Scanning Speed 2-3 seconds per image Image Quality 14 MegaPixels (22 MegaPixels interpolated) Output Format JPEG files saved on SD memory card Power Source Built-in rechargeable battery Display 5″ instant preview LCD screen Warranty 2-year warranty & tech support
Get It From Amazon Now: Check Price on Amazon & FREE Returns
4. Magnasonic All-in-One 24MP Film Scanner with Large 5″ Display & HDMI, Converts 35mm/126/110/Super 8 Film & 135/126/110 Slides into Digital Photos, Built-in Memory (FS71)
As someone who cherishes memories and values the importance of preserving them, I found the Magnasonic All-in-One 24MP Film Scanner to be an absolute gem. This device is not just a scanner; it’s a time machine that allows me to convert my old film negatives and slides into high-resolution digital photos. Imagine the joy of bringing back to life those precious moments captured on 35mm, 110, 126, and Super 8 films! With a remarkable resolution of 24MP, the scanned images are not just duplicates; they are vibrant and detailed representations of my cherished memories.
One of the standout features that I absolutely appreciate is the large 5″ LCD display. It allows me to view my films, slides, and scanned images directly on the scanner without any hassle. I love that I can quickly preview my images before finalizing the scan. The added convenience of using an HDMI cable (though not included) to view my scans on a larger screen is a fantastic touch. This feature means I can easily share memories with family and friends in a more engaging way, making it a great option for family gatherings or nostalgic evenings.
Another significant advantage is the built-in memory and SD card slot. With 128MB of internal memory and the capacity to expand up to 128GB with an SD card, I can scan and save a lifetime of photos without worrying about running out of space. This feature allows me to keep everything organized and ensures that my memories are safe, secure, and easily accessible whenever I want to relive those moments.
What I truly love about the Magnasonic scanner is its user-friendly operation. There’s no need for a computer, complicated software, or lengthy installation processes. I can adjust brightness, perform RGB color correction, and flip or mirror images directly on the scanner. This straightforward functionality makes the entire scanning process quick and efficient, allowing me to scan each photo in less than 5 seconds. I appreciate that this scanner is designed for people like me who want to preserve memories without diving into technical intricacies.
the Magnasonic All-in-One 24MP Film Scanner is a must-have for anyone looking to digitize their old film and slide collections. Its ease of use, impressive resolution, and convenient viewing options make it a worthwhile investment for preserving memories. I believe that this product can genuinely enhance the experience of reliving past moments, and I encourage anyone who has a collection of old films or slides to consider adding this scanner to their home. It’s not just about converting images; it’s about keeping memories alive for generations to come.
Feature Description Resolution 24MP high-resolution digital JPEG files Display 5″ LCD screen for direct viewing Memory 128MB internal memory and SD card slot (up to 128GB) Ease of Use No computer needed; simple adjustments on the scanner Scanning Speed Less than 5 seconds per photo
Get It From Amazon Now: Check Price on Amazon & FREE Returns
Why Converting Negatives to Digital Photos Helped Me
As someone who has always cherished the memories captured in photographs, converting my old negatives to digital format was a game changer for me. I had boxes of film negatives tucked away, each holding a piece of my past, but accessing those memories felt daunting. Once I decided to convert them, I was amazed at how this simple step brought my cherished moments back to life in a way that I could share and enjoy easily.
One of the biggest benefits I experienced was the ability to preserve my memories. Film can degrade over time, and I worried that my precious photographs would be lost forever. By converting my negatives to digital files, I ensured that those memories were preserved for future generations. I now have the peace of mind that my family history is safe and accessible, allowing me to share these moments with my children and grandchildren.
Additionally, digitizing my negatives opened up a world of creative possibilities. I could easily edit, enhance, and organize my photos, which wasn’t possible with physical negatives. I found joy in creating photo albums and sharing my favorite moments on social media. This not only rekindled my passion for photography but also allowed me to connect with friends and family through shared memories. Overall
Buying Guide: Convert Negatives to Digital Photos
Understanding the Importance of Digitizing Negatives
I’ve always cherished my old photographs, especially the negatives that hold memories from years ago. Digitizing these negatives not only preserves these memories but also makes them easier to share with family and friends. I realized that having a digital copy allows me to access and enjoy my photos anytime, without worrying about physical deterioration.
Choosing the Right Method for Conversion
When I decided to convert my negatives, I found that there are several methods available. I could either use a dedicated film scanner, a flatbed scanner, or send my negatives to a professional service. Each method has its pros and cons, so I had to consider my budget, the volume of negatives, and how much time I wanted to invest in the process.
Evaluating Scanner Options
If I were to choose a scanner, I would focus on resolution and ease of use. Higher resolution scanners capture more detail, which is essential for enlargements. I also looked for features like dust removal and color correction, as these can significantly enhance the quality of my digital images.
Considering Professional Services
For those who prefer convenience, I found that hiring a professional service is an excellent option. I appreciated that professionals often have high-end equipment and expertise to ensure optimal results. However, I had to weigh this against the cost and how many negatives I wanted to convert.
Assessing the Costs
Budgeting for the conversion process was crucial for me. I noticed that the cost can vary widely based on the method I choose. Dedicated scanners can be a one-time investment, while professional services charge per negative. I had to determine which option aligned with my financial situation and the value I placed on my negatives.
Preparing My Negatives for Scanning
Before starting the conversion, I learned that cleaning my negatives is essential. Dust and fingerprints can affect the quality of the scans. I took the time to gently clean my negatives using a soft cloth and a proper cleaning solution to ensure the best results.
Post-Conversion Editing and Storage
Once my negatives were digitized, I wanted to enhance the images. I discovered that basic photo editing software could help me adjust brightness, contrast, and color balance. After editing, I made sure to store my digital files in multiple locations to prevent loss. Cloud storage and external hard drives became my go-to options for safe storage.
Sharing My Digital Photos
Finally, I couldn’t wait to share my digital photos with family and friends. I considered creating online albums or printing some of my favorites. The joy of sharing these memories in a digital format was incredibly satisfying and made the entire conversion process worthwhile.
: Embrace the Transformation
Converting negatives to digital photos was a rewarding experience for me. I learned that choosing the right method, preparing my negatives, and properly storing my digital files were all key steps in preserving my memories. I encourage anyone with old negatives to consider this transformative journey.
Author Profile
-
Hi, I'm Steve Bunch. Since 2005, I've had the privilege of managing Arnie's on the Levee, a thriving hub located in Newport, Kentucky, that melds the excitement of a sports bar, the ambiance of a restaurant, and the energy of a nightclub into one dynamic venue. Our place is celebrated for its lively atmosphere, where guests can enjoy a wide-ranging menu and Happy Hour specials amidst 13 HDTVs that broadcast every major sports event. Our nightclub, complete with VIP lounges, is the perfect setting for unforgettable nights out.
Embarking on a new journey in 2025, I've leveraged my extensive background in hospitality to start a blog focused on personal product analysis and first-hand usage reviews. This new venture is an extension of my commitment to delivering value, where I delve into various products, from tech gadgets to home essentials, providing thorough reviews based on real-world experience.
Latest entries
- March 12, 2025Personal RecommendationsWhy I Switched to a Washing Machine Box with Drain: My Expert Insights and Personal Experience
- March 12, 2025Personal RecommendationsWhy I Switched to Surface Mount Outdoor Electrical Boxes: My Expert Insights and Experience
- March 12, 2025Personal RecommendationsNavigating the Intricacies of Love: My Personal Journey Through ‘The Wife, The Maid, The Mistress’
- March 12, 2025Personal RecommendationsWhy I Switched to Shower Rod Holders for Tile: My Expert Experience and Tips for a Perfect Installation